Monday, 23 December 2013

Spaghetti with Pork Belly, Fennel Seeds and Chilli

How's everyone doing? Are we all ready for Christmas?

We're just about ready I think at home... only few bits of food shopping and that will be it... as far as Christmas eve's dinner and Christmas day lunch.  Looking at my to-do list, tomorrow I only need to make dessert, prep the veg and brine the chickens.... nothing complicated.  In case if you're wondering, we're having chickens for Christmas not turkey... we'll roast a turkey for new year instead.

The past few days, mom and I have been baking and frying non-stop... we have lots of orders coming for homemade cookies and crisps.  Earlier today we baked trays after trays of cinnamon cookies and snow cookies (they're like shortbread but covered in icing sugar). And tomorrow we'll be baking pineapple cookies (nastar cookies) and kastangels which are Indonesian cheese sticks.  Fun day, I'm predicting :)

But even on the busiest day, I never skipped a meal... So, yesterday for lunch I made this spaghetti with pork belly, fennel seeds and chilli.  This is a real gutsy yet simple pasta dish... I love slow-roast pork belly with fennel seeds and I am a pasta addict; so borrowing the flavour elements of the pork belly and combining it with spaghetti, this is most definitely my kind of meal. 

Here's how I make it. In a heavy bottomed frying pan, heat up a splash of olive oil.  Then add in the pork belly slices and fry for a few minutes until the meat starts to colour and the fast has rendered slightly.  Be sure to use a big pan though, or otherwise the meat would braise and it won't colour nicely.

Whilst that cooking, make sure you start boiling the water in a big pot as well to cook the spaghetti.  Also, finely chop some shallots and garlic; and in a pestle and mortar, bash the fennel seeds, chili flakes and salt. Add these to the pork belly and cook until the meat becomes crisps around the edges, slightly caramelized and the spices form almost like a crust on the pork belly slices.

Season your water generously with salt and cook the pasta.  Stir in some dried oregano to the pork belly mix and if you have a bottle open, pour in some wine (I use red, but white is good too) and really scrape the sticky bits on the pan.  Turn the heat down. 

When the spaghetti has cooked to al dente, drain it in a colander, reserving some of the pasta cooking water. Toss the spaghetti around with the pork belly... if it's too dry, add a glug of olive oil and the reserved cooking water to give you a shiny finish.  The only thing I'm regretting is not having any fresh parsley... not only to sprinkle on for the sake of sprinkling/garnish but really to add bright flavour to the dish.  But it's not the end of the world obviously if you also don't have any. 


Anyway, I most likely won't be blogging again until after Christmas, so I want to say Merry Christmas to all of you... Have a wonderful time with family and/or friends with plenty of food and drinks.  And I hope Santa will bring you nice presents :)

Monday, 16 December 2013

Orange and Cinnamon Egg Custard Tarts

One of the baking shortcuts I often buy ready-made is puff pastry.  It's convenient and it saves a lot of time. I first learn to make puff pastry during my work experience as a culinary trainee in a hotel over a year ago. Making puff pastry at home is not too difficult, but yes, it does take time and patience. And I feel cooking/baking is like learning a language, if you don't practice enough, you might forget... just like my rusty French.  So in the spirit of that, I made my own puff pastry for the custard tarts.

I use Paul Hollywood's puff pastry recipe which you can find here.  The instructions are clear but be sure you read it through before you start.  The pastry needs to be chilled overnight twice, so you need to start early with the process.  

What I find most challenging is the weather... something I cannot change obviously. I wish I had the power to control the weather like Storm from X-Men... hmmm... question of the day: what superpower would you want?

Anyway, my point is when working with puff pastry, keeping it cold is crucial. You don't want the layers of butter to melt prematurely, making the dough soft, sticky and difficult to work with. It's hot and humid where I am right now and even though I have a cold work surface (a marble table) and a pair of cold hands, I still have to work quickly before the dough soften too much.  

The custard part is easy... and you can infuse or add any flavours you want.  But for me the scent of cinnamon, vanilla and warm orange is quintessentially Christmas, so I have to go with that.  And topping the custard tarts is freshly grated nutmeg.


Orange and Cinnamon Egg Custard Tart

100 gr caster sugar
3 egg yolks
1 tablespoon cornflour
1 teaspoon vanilla paste, or the seeds from 1 vanilla pod
Zest of 1 orange
250 ml full fat milk
1 cinnamon stick
Nutmeg

Homemade or store-bought puff pastry

If you're making your own puff pastry, start with that. Once it's made, preheat your oven to 200 C and butter the holes in a 12-hole muffin tin.  Then roll your pastry on a floured surface, neither thin nor thick and cut out 12 discs using a cutter.  Press each disc into the muffin tin holes.  If you live somewhere warm like me, it's a good idea to put the pastry back in the fridge for 15 minutes or so to chill.  Line each one with baking parchment and fill with few baking beans and blind bake for 10-15 minutes.  Leave the pastry to cool completely in the tin.  Leave the oven on.

Let's make the custard.  Warm the milk in a saucepan with the cinnamon stick.  In a bowl, whisk the yolks, sugar, cornflour, vanilla paste and orange zest until creamy and pale.  Slowly pour the warm milk onto the yolk mixture and stir well.  Return this mixture into the pan and cook on a low heat until it thickens.  Stirring all the time.

Pour the custard into a small jug and then into each of the cooled pastry cases, filling almost to the top. Grate the nutmeg on top of the custard and place the tarts back in the oven for 10 minutes.  The custard will form a slight dome during baking which is fine... it'll sink back down when cooling.  

Let the tarts cool slightly in its tin then remove them carefully from the tin... and you know what to do next... (if you're like me, you'll be making a hot cup of coffee and enjoy the egg custard tarts in an air-conditioned room).

Monday, 9 December 2013

Christmas Stollen Bread

I've been waiting for weeks to bake this Christmas stollen bread and it's finally here... Christmas is finally here. I mean you can obviously bake a stollen bread any time of year you want, but to really appreciate the beautiful wreath effect, it's got to be this time of year.


The wreath shape is inspired by a Martha Stewart recipe.  I saw a video where she bakes this stollen bread with her mom a couple of years ago and I thought it's looks so festive that I have to try it and so glad that I did. But since then I have altered the stollen bread recipe with all sorts of my favourite dried fruits and Christmasssy flavours.


I use a mixture of regular raisins and golden raisins, mainly for aesthetic reason... but the best part is, they have been soaked in whisky overnight... so that they plump up again and bursting with booze :) I also use dried cranberries because I like a bit of tang... dried sour cherries will be delicious as well. But speaking of cherries, as you can probably see from the picture above, I also add a good amount of ruby red glacĂ© cherries which I know is old school but it makes me happy... If I had some currants and mixed peel I would have added them as well... the more the merrier.

Nuts wise, I like cashews... but almonds, pistachios, walnuts can also be used.  Whichever makes you happy.

Christmas Stollen Bread

350 gr plain flour, plus more
350 gr strong white flour
6 tablespoons caster sugar
14 gr dried yeast
10 gr salt
200 ml whole milk
140 gr butter
3 eggs, lightly beaten
Zest of 2 oranges
Zest of 1 lemon
180 gr raisins
180 gr dried cranberries
120 gr dried apricots, cut into small pieces
120 gr red glace cherries, cut into small pieces
100 gr cashews, lightly toasted and roughly chopped

In a small saucepan, heat up the milk and butter until the butter is melted.  Set aside to cool a bit.  In a small bowl add the yeast with four tablespoons of warm water and stir to dissolve the yeast.  Let stand for 2-3 minutes.  In a big bowl, add the flours, sugar and salt.  Now add the yeast, warm milk and butter and the lightly beaten eggs to the flour mixture.  Start mixing and knead until fairly smooth on a well floured work surface. I'm gonna admit that I do this first kneading using a machine to save time and then continue by hand...

When you have a smooth dough, put it back in the big bowl and start adding the raisins and all the leftover whisky (if using), zests, dried cranberries, apricots, cherries and cashew nuts.  Knead them some more until the fruits and nuts are evenly distributed. If the dough is sticky, add a bit more flour.

Place the dough in a buttered bowl, cover with clean tea towel and let it rise for an hour and a half to two hours. Depending the temperature of your room.

When the dough has risen, punch it down (I like this bit) and with a rolling pin, roll into a rectangle.  Try to make sure the thickness is even all over. Now, starting with the long side, roll it up tightly, forming a cylinder. Join the ends together to form a large circle.  Then transfer it to a buttered tray or you can line with non-stick parchment.

Using a scissor, make cuts alongside the circle in intervals, about 2/3 of the way through the dough.  Cover it again with tea towel and let the dough rise for half an hour or so.  Pre-heat your oven to 190 C.

Brush dough with melted butter and bake in the oven for about 45 minutes, rotating halfway through.


Place on a wire rack to cool and dust with with icing sugar before serving.  Make yourself a cup of tea or coffee, slice the stollen and you know what to do next...

Friday, 22 November 2013

Lemper Ayam - Glutinous Rice Roll with Chicken

Glutinous rice roll with chicken or known as lemper ayam in Indonesia is one of my favourite anytime snacks.  I love it when I was a kid and I still love it today... especially now that I can make these little parcels of deliciousness on my own and I want to share it with all of you...

I was quite surprised that these rice rolls are easy to make and please don't be put off by the lengthy explanation. It does take patience which if you know me, I have none... but actually after a while, the repetitive activity of rolling and wrapping become somewhat therapeutic.  And it requires practice to shape the rolls.  My first few rolls were a bit wonky, but after making hundreds of these (yes, seriously), they look just like the real deal :)

So let's get to it... First job is to soak the glutinous rice in water.  The rice needs to be soaked because the grains are harder.  Soak it at least a couple of hours prior to cooking or longer if you can remember.  Now, make the filling. Here I use chicken, but if you prefer, beef, pork or prawns are delicious too.  Despite my love for chicken thighs, this time I use chicken breasts because I think they shred better.  There are also recipes that use minced chicken, but I prefer the texture of the shredded chicken. 

Poach a couple of chicken breasts (skin-on, bone-in) in plenty of water until it is cooked through.  Let it cool a bit, remove the skins and bones and shred using the method of your choice.  Save the poaching liquid. We're going to use it to cook the rice.

To make the bumbu for the chicken, in a blender add in 3 shallots, 3 cloves of garlic, 2 tsps coriander seeds, 1 tsp cumin seeds, 3 candlenuts and kencur.  Let's talk about that last ingredient... Kencur (sometimes spelled kentjoer) or known as kaemferia galanga in Latin (sounds like a spell from Harry Potter doesn't it?) or zedoary in English is a root plant related to ginger and turmeric (sometimes referred to as white turmeric). It is fragrant like one of those aromatherapy oil.  It has a warm taste like ginger but also bitter, so use it sparingly.  If you can get hold of it, great... but if not, I'd use ginger or galangal.

Question of the day: have you came across kencur/kaemferia galanga/zedoary before? 

Blend the spices with a little water until smooth.  Gently fry the bumbu in a pan with vegetable oil until fragrant.  Then add the shredded chicken and toss it around, making sure it is all coated with the spices. To this, add coconut milk, finely cut kaffir lime leaves (be generous with it) and season with salt, white pepper and a good sprinkling of sugar. Not too sweet that this becomes a pudding, but just enough to balance all the flavours. Let the mixture simmer for a bit until all the spices is absorbed.  Give it a stir every now and then. The important thing is to make sure the filling is not completely dry.  Taste and adjust the seasoning.  The filling can now be put to one side to cool... or actually this can be made the day before and keep in the fridge.  This amount of filling should be enough for approximately 25 rice rolls.  

If you want to add curry powder to the filling, go for it. It's actually really nice as well.


Cooking glutinous rice is very simple especially since I use a rice cooker.  Drain the rice of its soaking water and rinse it thoroughly. Cook the rice using the reserved chicken poaching liquid, coconut milk and season with salt.  To make the rice even more fragrant, also throw in a couple of pandan leaves.  For every cup of rice, I use one and a half cup of chicken poaching liquid and half a cup of coconut milk. 

While the rice is cooking, prepare the banana leaves. I don't know how accessible is banana leaves where you live.  I get mine from the farmers market.  If you can get it, that's awesome. But if you can't, plastic wrap or non-stick parchment paper is an option, but it just won't have the same effect. If using banana leaves, trim the edges and cut into rectangles Wipe both side of the banana leave with a damp cloth.

Place the leaves with the stripes going horizontal facing you as pictured below.  When the rice is cooked, let it cool a little, but not completely cold.  It's easier to shape the rice while it's still warm.  And because I want the rolls to be the same size, I weigh the rice on the banana leaf... 50 gr of rice for each roll is just the right couple of bites for snacking.  Now, use a plastic spoon to flatten the rice to a rectangular shape.  The reason I use plastic spoon is because the rice don't stick as much to plastic as opposed to stainless steel cutlery.

Place the shredded chicken to one end of the rice.  There is a temptation to put as much filling as possible... but don't.  Too much filling and the roll will burst. Believe me, I know.  A couple teaspoons of the filling is plenty.


With the help of the banana leaf, lift the rice and shape it into a mound covering the filling on all sides.    


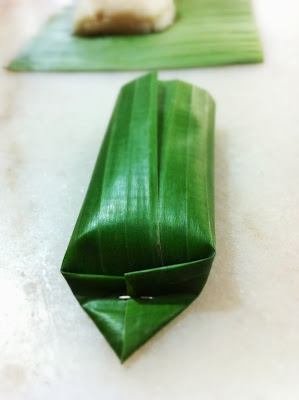
Fold the banana leaf as if you're wrapping a present.  Do this tightly but gently, trying not to rip the leaf.  You can secure the end using a small cocktail stick or toothpick, but I find using a stapler is much easier.  


Completely for aesthetic value, I trim the edges with scissors. I just think they look neat this way... and guess what, we're almost at the end :) 


Using a non-stick pan, heat a tablespoon or so of vegetable oil over a medium heat and fry the parcels just until the skin is nicely charred on both sides.  Leave the lemper to cool a bit... it's best eaten warm or at room temperature.  Should you have any leftovers, store in the fridge and re-heat in the microwave.


So, there you go... I hope you enjoy this post and are inspired to try it at home.  Have a wonderful weekend friends! I haven't got anything special planned but I'm sure I'll find something to do in the kitchen. x

Sunday, 17 November 2013

Daging Bumbu Bali - Balinese Beef Stew

I am fortunate enough to be able to travel around the world... and Bali, without a doubt is one of the most beautiful places I visited.  The gorgeous beaches, the sun, water sports, rice fields, etc... which to be honest normally isn't my kind of place... if you know me, I don't do well in the heat and humidity.  My kind of holiday will be somewhere in a mountain, like the Swiss Alps where it is cold or the Scandinavia... I haven't been but I imagine it's gonna be cold over there and I love it... 

But anyway, I love Bali and I actually look forward to visiting again soon.  What I most excited about is the delicious food... babi guling (suckling pig) , bebek betutu (Balinese roast duck), sate lilit (minced chicken/fish satay), and many more... but until then I am fulfilling my cravings with my Balinese beef stew.

Making the stew is easy though a little patience is required... allow the beef to simmer slowly until it is tender and flavoursome.  Or if you're some kind of saint with a lot of patience and self-control, like many other stews or curries, this stew tastes even better the next day... 

And of course you can replace the beef with pork, the latter being a Bali favourite... but the spice paste / bumbu remains the same regardless the type of meat you choose.   

Most of the ingredients are available in supermarkets, but you might need to make a trip to your local Asian grocery store to get these three ingredients: First, kaffir lime leaves, one of my favourite scents and flavours. Kaffir lime leaves have a distinctive floral and citrus aroma which makes it difficult to substitute. If you can get fresh ones, great, but also look out in the frozen sections.  If you can't find it anywhere, use lime zest instead but it's just not gonna be the same.

Second, candlenuts... which in appearance look like large hazelnuts. In Indonesian cuisine, they are often used as a base and thickener for various spice pastes, also sambal and satay sauces.  When I don't have them around, I use brazil nut, macadamia or cashew.  Your pick. 

Last but not least, dried shrimp paste... or often known as terasi or trassi or belacan.  It's a common and widely-used ingredient in South-East Asian cooking.  It is dark in colour and it has a pungent smell, revolting to some people, but I find it utterly delicious. One advice from me, when handling the shrimp paste, make sure you use a spoon, because the aroma may sticks to your hands for hours otherwise.  


You can make the spice paste in a blender or using pestle and mortar.  If you are using a blender, add a couple of tablespoons of water which will help the blending process and I'd suggest not to make the paste too smooth.  It's nice to have a little texture in the stew.

Gently fry the bumbu in oil until fragrant just for a couple of minutes.  Then add the meat and cook until lightly browned.

Now add the kaffir lime and bay leaves, bruised galangal and finely minced/grated ginger and cook for another couple of minutes.  Season with salt and white pepper.

Stir in the water, sweet soy sauce, tamarind water and when it comes to a boil, clamp on a lid and let it simmer for an hour and a half to two hours or until the meat is tender.  Give it a stir from time to time and add more water if the it reduces too much.  Adjust the seasoning.  Serve with plenty of rice and you know what to do... x


Daging Bumbu Bali - Balinese Beef Stew
Recipe by Me

2 tablespoons vegetable oil
500 gr stewing beef, cubed
4 kaffir lime leaves, cut into little pieces
2 bay leaves
2 cm piece fresh ginger, finely minced/grated
2 cm piece fresh galangal, lightly bruised
400 ml water
100 ml tamarind water
3 tablespoons sweet soy sauce
salt and white pepper, to taste

For the spice paste
3 garlic cloves
8 shallots
1 tablespoons coriander seeds, lightly toasted
2 candlenuts, lightly toasted
3 red chillies
1/2 teaspoon dried shrimp paste
salt

Saturday, 9 November 2013

Perkedel Kentang - Potato thing you can help me name

The word perkedel derives from Dutch word frikadel; which I believe these days in The Netherlands is a sausage or meatball type of snack.  Any Dutch or more knowledgeable readers please correct me if I'm wrong.  In Indonesia, perkedel is used for variety of foods made with vegetables or minced meat or fish or a mixture of all the above.  So, dishes like corn fritters, fish cakes and potato patties all fall into the perkedel category... which sounds convenient, but I am having a hard time what to call this potato thing I made in plain English.  This should be easy, right, but my brain is not working.

I was going to call it potato patties, but they look neither like patties nor fritters... Potato cakes?! naahh... Croquettes? maybe? that's the closest resemblance perhaps. OK, that can be my question of the day, what would you name this dish? 

To help you (or not) I'll explain how I make this potato thingy which is very simple.  It's basically a spiced up, shaped, breaded and fried mashed potatoes (ooohhh... that's an idea for a name).  This is a great way of using leftover mashed potatoes should you have any and turning it into delicious afternoon snacks.

I'm sure I don't need to tell you how to make mashed potatoes... but just in case, I steamed five medium size potatoes until soft or until they can be pierced with a knife easily.  People with good common sense will let the potatoes cool a bit before they peel the skin, but I have asbestos hands and also impatient.  I actually rather like lumpy mashed potatoes, but for these not-yet-named thing, it's best to have smooth mashed potatoes... and a potato ricer comes very handy to achieve this texture.  Now let the mashed potatoes cool a little while you prepare the bumbu.     

The bumbu is nothing unusual.  It's just four finely chopped shallots and a couple of cloves of garlic which need to be finely grated; and also a couple of seeded and finely chopped red chillies.  Add this to the potato mixture.  Season with salt and white pepper to taste.  Last but not least, freshly grated nutmeg which works so well with mashed potatoes.  You can also add celery, spring onions or parsley if you want for a bit of greenery.

I then add 200 gr of minced beef... although if I remember correctly, when I was a kid, mom used corned beef... also equally delicious.  So, take your pick.  Then add a couple of eggs to help bind the mixture.

Now shape this in any way you like... but you may want to shape it in a form that can be easily named... like patties or meatballs, and coat them with breadcrumbs.  I shaped mine like a cylinder and here I am... (name idea: potato rolls?)

Coat with breadcrumbs and deep-fry in hot oil until golden and cooked through.


I like using those coarse Japanese breadcrumbs or panko for extra crunch.  Serve with chilli sauce or tomato ketchup or whatever tickle your fancy.


Have a great weekend friends! x

Sunday, 27 October 2013

Ayam Paniki - Sulawesi Style Spicy Coconut Chicken

Whilst doing the research for this recipe, I discovered that the word paniki means bats...  I thought it was a region or a city where the ayam or chicken dish originates from.  So yes, this dish was traditionally cooked using bat meat... Even though, they are still relatively easy to find here in Indonesia, I am sticking to the more popular version using chicken.

The thought about cooking this dish the traditional way did occur in mind... something for Halloween... but when I look at bats, they look just like rats with wings... don't they?

The bumbu for ayam paniki is pretty simple... at least for my version and you should be able to find all the ingredients at most supermarkets these days.  And the cooking process is also easy which is always nice to know.  You start by gently frying the finely chopped shallots, finely sliced red chillies and minced ginger in a little vegetable oil until softened.  Add a pinch of salt to prevent them from burning.  There are versions of ayam paniki to which ground turmeric is added for extra golden-ness, but it's entirely up to you. 

For this dish, you can use a whole chicken, cut into pieces but I prefer using all chicken thighs... they have more flavour compare to breast meat and also cheaper :)  Season the chicken with salt and white pepper then add them to the pan and cook until golden brown.  


Now add the chopped garlic and the lightly bruised lemongrass stalk.  I add the garlic last because if you add them too early in the cooking, they might burn and become bitter. Definitely don't want that and continue stirring for a couple of minutes.

Pour in the chicken stock and coconut milk, just enough to cover the chicken.  For one whole chicken or 8 pieces of chicken thighs, I used 400 ml of chicken stock and 100 ml of coconut milk.  To balance the heat from the chillies, add a couple teaspoons of crushed palm sugar or use dark muscovado sugar.  Let this comes to a boil and then simmer for 30 minutes or until the chicken is cooked through and the sauce is reduced. Stirring occasionally. Taste and adjust the seasonings.

Sprinkle with more fresh red chillies if you want and enjoy with a big pile of white rice. Yum.


Question of the day: Has anyone ever eaten bat meat? If yes, what did it taste like? chicken? If no, do you fancy trying it?

Monday, 21 October 2013

Babi Panggang Manado - Roast Pork Belly, Manado Style

I'm sure roast pork belly is not one of the first things that comes to mind when talking about Indonesian cuisine.  The majority of the population are Muslim and therefore do not eat pork, but you can still find pork throughout Indonesia.  Many Chinese and western restaurants serve pork dishes, and also it depends on where you are in Indonesia.  For example, on the island of Bali where the majority of the population are Hindu, you'll find pork in many of its traditional dishes.  Also where I live in Medan, north Sumatra, pork dishes can easily be found.  

But today I want to take you to the city of Manado in northern Sulawesi where there is a relatively large number of Christians which explains the consumption of pork. I've never been to Manado but it is on my list of places to visit.  Bunaken National Park in Manado is a popular spot for scuba diving and snorkeling.  But what I'm more interested in, is the food.   


One of the main characteristics of traditional Manado dishes is spiciness.  Not just hot, but I mean like crazy-fire-in-your-mouth hot... which is why I used the seeds and all when making the bumbu or the marinade for the pork belly. But of course you can de-seed if you want the flavour to be milder.  Though actually the final result wasn't that spicy... I don't know if that's because of the chillies that I used weren't that spicy in the first place; or I've been here long enough that my heat tolerance level has gone up. Probably both.

With the red chillies, other ingredients include shallots, garlic and tamarind water.  If you're using a pestle and mortar to make the marinade, I suggest adding a little salt which will aid the crushing and grinding process. But you can as easily use a blender... 


To the pork belly, make sure you score the rind... you can ask your butcher to do this or use a small kitchen cutter.  This little slashes will help the marinade to penetrate into meat.  I admit, the crackling won't be as crunchy because of the wet marinade, but it's still gonna be good.  Rub the bumbu all over the pork belly and let it marinade for at least a couple of hours or even better, overnight in the fridge.


Take the pork belly out from the fridge about an hour before you roast it so that it gets back to room temperature.  And preheat your oven to the hottest temperature... make sure the oven is clean, otherwise it'll smoke like crazy.  In Manado, I believe the pork is cooked over charcoal, but I think an oven is more accessible, for me anyway.  Drizzle the pork belly with a little olive oil and season with salt (I only put a little salt when making the marinade, so it'll definitely need more).  Roast in the oven for half an hour (skin side up) to get the colour going and to render some of the fat.

After thirty minutes, turn the heat down to 150 C.  Carefully get rid of the fat and add into the tray, 500 ml of chicken stock and continue cooking for another couple of hours. Do check after an hour... if the colour gets too dark, cover it with foil.  When the pork belly is cooked, take it out of the oven and let it rest before cutting into generous slices. 


I'm sure in Manado, they eat the pork belly with other side dishes, but whenever I roast a pork belly, I must have it with braised red cabbage with apple, bacon and balsamic vinegar.  I just love the acidity from the vinegar that cuts through the I richness of fatty pork belly... and my family loves it too, so as long as everyone's happy, it's all good!

Last but not least I want to say thank you to everyone for the messages and kind birthday wishes last week. You guys are awesome! I ate lots of cake which actually is no difference to any other day, but yeah... I had a nice day. Thanks again.

Have a great week ahead! x

Monday, 14 October 2013

Semur Ayam - Chicken Stewed in Sweet Soy Sauce

The past few months, I have been having a lot of fun building my culinary repertoire of Indonesian dishes. I mean even though I was born and I grew up here for the first fifteen years of my life... back then, all I did was mostly the eating... if you've seen pictures from my childhood, you'll understand.  I have burned most of them, but I know there are still one or two around somewhere... 

But anyway, now that I am also very much interested in not just the eating, but also the cooking... it's been a pleasurable experience which I want to share with you.  It's fair to say that my cooking is Italian-French-British influenced as seen by the many recipes featured in this blog.  But my purpose of starting this blog is I want to be a better cook, and the great thing about cooking is it's a constant learning experience...

I have sampled many dishes... truly hard work, I know... (the time I spent on that cross-trainer) but I'm not complaining... it's just one of the things I'd happily do for you all; I've done my research; extracted recipes from my mom's brain (now, that's the challenge) and I played around in the kitchen trying to replicate the dishes I tried.

So, over the next few posts, I want to share with you some of my favourite Indonesian dishes and ingredients.  Some are old favourites and a few are new discoveries.  I hope you are excited... because I am! 

I want to start with a dish that is simple and homey, like semur ayam or chicken stewed in sweet soy sauce. This chicken stew can be found pretty much everywhere in Indonesia.  But depending on the region where it's cooked, the stew may varies.  I have seen other variants using plenty of spices like cinnamon, nutmeg, star anise, coriander and cumin; also other ingredients such as potatoes and hard-boiled eggs may be added too to the stew. But I am keeping mine to the basic and this is how we often cook it at home.


The word semur itself derives from the Dutch word smoor meaning smothered.  Indonesia was colonised by the Dutch for over three centuries, so there are many Dutch-derived words in Bahasa Indonesia.  The chicken stew here is smothered in sweet soy sauce which later gives the distinctive dark colour.     

Sweet soy sauce or known by the locals as kecap manis is perhaps the most commonly used and well-loved Indonesian food condiment.  I certainly love it.  Give me a bowl of plain white rice, fried egg and kecap manis, and I am all set (see, I am easily pleased).  I was going to say sambal is the most popular food condiment, but to many Indonesians, sambal is another pretty much another food group, not just a condiment.  I'll talk about sambal more in the upcoming posts.

When you see 'kecap' in Indonesian recipes, or when someone asks for 'kecap' in Indonesia, they will always mean kecap manis.  It is made by cooking the fermented soy liquid with palm sugar and spices.  The sugar makes the sauce syrup-like.  The sauce can be found easily in Asian grocery store.  But UK readers, I'm sure I've seen it sold at M&S with the old Indonesian spelling of 'ketjap manis'.  However, if you can't find sweet soy sauce anywhere, I suggest using the regular soy sauce and then add some palm sugar or dark muscovado sugar.

Whilst we're on the subject, if you're interested, the regular Chinese or Japanese soy sauce is known as kecap asin (salty soy sauce), but this will often be specified... as well as kecap ikan (fish sauce) or kecap Inggris (English sauce/Worcestershire sauce).

Have a great Monday everyone!

P.S. It's my birthday and I don't have a plan just yet... but I'm sure there will be a cake at some point today. I'll keep you posted via twitter and instagram. 

Semur Ayam - Chicken Stewed in Sweet Soy Sauce
Recipe by Me

1 chicken, jointed and cut into small pieces
Vegetable oil for frying
4 small shallots, finely chopped
3 garlic cloves, finely chopped
2 cm piece of ginger, peeled and finely grated
2 tablespoons tomato ketchup
3 tablespoons sweet soy sauce / kecap manis
400 ml chicken stock
Salt and white pepper

Heat up a generous layer of oil in a pan or wok of your choice over a medium heat.  Season the chicken pieces with salt and white pepper and fry until they are nicely brown on all sides.  Depending on the size of the pan/wok you're using, you might need to do this in batches.  Overcrowding the pan will cause the chicken to braise and they'll not colour properly.  If you've done this before, you know that the oil will splatter, so please be careful... and if you haven't done this before, this is your warning :) When the chickens are browned, drain on paper towel and set aside.


Using the same pan, gently cook the shallots, garlic and ginger until they are beginning to soften and become fragrant.  Then add the tomato ketchup, sweet soy sauce, chicken stock and the chickens.  Let it comes to a boil and then simmer for 30-40 minutes or until the liquid boil down to a thick, glossy, dark syrup and the chicken pieces are very tender.  Give it a stir from time to time. 

Taste and adjust the seasonings, and serve over noodles or plain boiled rice.


Monday, 23 September 2013

Soba Noodle Salad with Salmon - Video

It's a wonderful Japanese tradition of eating cold noodles on hot summer's days... But before I proceed any further, I am so sorry if you're reading this on a cold, gloomy day... It is most certainly hot where I am.  If there's any consolation, I do not enjoy the sun... I much prefer a grey day.

I understand the notion of eating cold noodles may not be appealing to everyone, but I absolutely love it.  In fact, one of my guilt-less guilty pleasure is leftover spaghetti straight from the fridge with few dashes of Tabasco.  I need help, don't I... It's so delicious though... Anyone else a fan of cold spaghetti? Surely I can't be the only one... No?

Anyway... this soba noodle salad is one of my favourite quick meals.  The noodles takes minutes to cook (less time than regular pasta) and making the dressing takes seconds.  Soba noodles are made with buckwheat and they are normally darker in colour.  The one I used here was made with buckwheat and green tea.  I was expecting a more vivid green for a nice colour contrast against the salmon, but it turned out very pale... oh well.

To be honest, I am more than happy to eat the soba noodles just by itself and perhaps a bowlful of edamame beans and nice cold beer or sake (whatever is available)... but there are days when I want a bit more protein, and salmon goes really well with the noodle salad.  I simply pan-fry the salmon with salt, pepper and olive oil.  Though actually, thinking about it now, next time I'll have the soba noodles with sashimi, be it salmon or tuna.  But if you're not into raw fish or seafood in general, a simple grilled chicken will be lovely too.


And this is another video post which is always fun to make... In real life, this recipe takes less than ten minutes to make, but it took us a whole day to film it...  And again, the longest part to film was the title sequence... which, sadly and annoyingly, did not make the cut at the editing.  It just didn't look as good as what we had in mind... and we only want the best for yous all :)  I also want to say thank you to my partners in crime, Oflavia and Vincent for their talents and support. 


I hope you enjoy watching the video as much as we enjoy making it for you.  Don't forget to subscribe to the channel for more videos and hit the 'thumbs-up' button for me please :) Have a delicious day! x


Monday, 16 September 2013

Twice-Fried Korean Chicken Wings

When I was in Singapore, my friends took me to this Korean restaurant where they are known for their chicken wings.  And no wonder why people would line up for the wings... They were absolutely delicious... the skin was delicate and crunchy and it was coated with this sweet, spicy and sticky chilli glaze.  I love it and I just have to make my home-version and I think it's pretty close :)

I apply the same principle of twice cooked chips to the chickens to ensure maximum crispiness... The chickens are lightly coated in seasoned flour then deep-fried in a lower temperature oil for several minutes, and then cooled and fried again at higher temperature.  I know it sounds a bit like a faff, but it really isn't I promise; and you'll thank me later as you bite into the crackly, crispy chicken skin.

Making the sauce takes hardly any skills... just mix them all together.  But if I may suggest, start with the rice wine vinegar, soy sauce, sugar and stir.  This way, it's easier for the sugar granules to dissolve into the sauce... and then proceed with the rest of the ingredients. I honestly don't know if smoked paprika is widely used in Korean cooking, but I want bacon-y smokiness in the sauce and that's why I use it.  But obviously it's optional; or perhaps add a bit (or a lot) of cayenne pepper if you want to make it extra spicy.  

Most of the ingredients should be available in supermarkets these days, but you will need to make a trip to your local Asian grocery store to get the Korean chilli paste, called gochujang which often comes in a red plastic container.

When you make the sauce, you'll probably think that it's a scant amount to coat all the chicken wings... but have some faith, it will!  I hope that you'll give this a go because it's seriously finger-licking good.

P.S. If you're not in a rush, I would highly suggest you marinade the chicken in a mixture of finely grated garlic, finely grated ginger, soy sauce, toasted sesame oil and white pepper... leave it in the fridge overnight or at least for a couple of hours.  Take it out of the fridge half an hour to an hour before frying so that they go back to room temperature. 


Twice-Fried Korean Chicken Wings
Recipe by Me

1 cup plain flour
2 tablespoons cornflour
1 teaspoon fine salt
1/2 teaspoon ground white pepper

1 kg chicken wings, tips discarded (save for stock), wings separated at the joint

Sauce/Glaze
2 tablespoons rice wine vinegar
1 tablespoon soy sauce
1 teaspoon caster sugar
2 teaspoon sesame oil
1 teaspoon smoked paprika (sweet or hot one), optional
1 heaped tablespoon Gochujang paste

Heat a deep, heavy-bottomed sauce pan half full of vegetable oil over a low heat.  Heat this to about 150 C if you have a candy thermometer.

Make the sauce in a big bowl by combining all the ingredients and mixing well. Give it a taste and adjust to your liking.

In a bowl, combine the flour, cornflour, salt and white pepper.  Coat the chicken wings thoroughly with the flour, shaking off most of the excess.

Fry them in batches for about 8 minutes, remove and fry the next batch.  You'll notice the wings will look pale now, but it's nothing to worry about.  They'll be golden soon.

Once all the wings had their first fry, turn up the heat and let the oil reach 180 C, and fry the wings again this time only for approximately 3 to 4 minutes, or until they are golden and cooked all the way through.

Remove the wings and drain on a platter topped with kitchen paper.  Now place the wings in the bowl with the sauce and tossing well until the wings are evenly coated all over... and apply to face.

Wednesday, 11 September 2013

Yogurt Pot Cake

I always feel that a house is not a home unless there's a cake in it... I know I keep telling you all (and trying to convince myself) that I don't have a sweet tooth, but we all know it's a big fat lie... I mean if I had to choose to eat between a savoury or a sweet dish, I'd most likely pick the savoury one.  But in an ideal world, I'd have both.

Currently at home we have not one but three cakes which makes me feel very safe when I need my sweet fix or something to nibble with my morning coffee or cup of tea in the afternoon. It was mom's birthday yesterday, so obviously there's a birthday cake (three layers vanilla sponge cake with strawberry jam and buttercream), a banana bread and this yogurt pot cake...  

This is a Nigella recipe; and the first time I bake this cake, I copied the recipe by watching and pausing the video (I haven't bought the book at the time)... and in the video, there was no mention of the (plain) flour quantity, in fact no mention of it... just the cornflour.  I thought that's odd... a cake with just cornflour? wouldn't it make the cake chewy and sticky? But I tried it anyway... and the result was as expected.  The cake was glutinous and just not the right texture... I mean it's still pleasant (the fact that we still demolished the whole cake) but I knew something's missing. 

When I got the book, I immediately look for the recipe for this cake and there I found the use of plain flour along with cornflour!  So, perhaps it's an editing mistake on the video, skipping one whole step to the recipe. Now, the recipe is called yogurt pot cake because most of the ingredients are measured in a yogurt pot... but I find this tricky because the size of yogurt pot I use is different to the one that Nigella uses.  Plus, I am more comfortable with the metric system. So here I give you the complete list of ingredients in metric.  But if you want to test the pot system, it's 1 pot yogurt, 2 pots sugar, 1 pot oil, 1 pot cornflour and 2 pots plain flour.   


I have my own method and I make my own addition though, but it's just my preference.  I add the zest of one lemon instead of 1/2 lemon, because I really want to taste the lemon.  I know, I know the cake is not called lemon yogurt cake, but if there's lemon in it, I wanna make sure it's there... not just in the background. Also instead of using vanilla extract, I use the seeds from one vanilla pod or use vanilla paste.  I quite like the look of little dots of vanilla seeds throughout the yellow cake in each slice. If you want you can use cake flour in place of the flours specified.  Because essentially cake flour is already a mixture of plain and cornflour. 

Thank you to the yogurt, this cake has a light, soft crumb and I especially love it when it's still a bit warm... and I think you will enjoy it as much as I do.


Yogurt Pot Cake
Recipe by Nigella Lawson

3 eggs, separated
250 gr caster sugar
150 gr plain yogurt
150 ml vegetable oil
175 gr plain flour
75 gr cornflour
Zest of 1/2 lemon
1 1/2 teaspoons vanilla extract
1 tsp icing sugar, to serve

1 x 22 cm savarin or ring mould (or 22 or 23 cm springform cake tin)

Now, start by preheating the oven to 180 C and grease your ring mould or cake tin with a little vegetable oil.

Whisk the egg whites until you have firm peaks, then set it aside.  In another bowl, whisk the egg yolks and sugar until airy and light before adding the yogurt. I use freestanding mixer if you're wondering. 

Then add in the vegetable oil... I add it a little at a time because I don't want to deflate the mixture.  Turn the mixer on low and add the flours.

Then scrape the sides with a spatula, making sure all the flour is incorporated into the batter.  Mix in the lemon zest and vanilla.  Now gently fold in the egg whites.  

Pour the batter into the tin and bake for 30 - 35 minutes.  You'll notice that the sides of the cake will begin coming away at the edges and a cake tester will come out clean when it's done.

Remove the cake from the oven and let it cool to a wire rack for ten minutes or so before turning it out. 

When it's cooled, transfer the cake to a platter and dust the top with icing sugar... and you know the what to do next.

Sunday, 8 September 2013

Not Quite Nigella's Mother's Singapore Chilli Prawns

I was in Singapore this past week and I had so much fun... and to be honest  it was a much needed break from everything that's been going on... but let's not get into that now.  I went there to see some friends which I haven't seen for months and even years, so it was really nice to hang out and catch up with everyone's life. It's funny how I haven't met some of my friends for a long time, but when we finally reunited, it felt like we never parted.

We went to this Korean place eating many delicious chicken wings... and after we're full, then we moved on to another Korean place and spent hours talking and drinking sweet rice wine.  I never had sweet rice wine before so this was a new experience and boy, it was good.  The wine is sweet but citrus-y at the same time and they don't even taste like alcohol which sometimes is not a good thing...

If you've been to Singapore before, you know that it is a shopping paradise... walking through Orchard Road, you'll see everything from designer brands to popular high street stores. Or if you're feeling cultural, there are plenty of historical sites and neighbourhoods to visit, temples and beautiful gardens.  But I wasn't here for that... Apart from seeing friends, I was in Singapore for the food!

One thing you must know about Singaporeans, they are obsessed with food and they take their food seriously! I am almost embarrassed (but I'm not really) by the amounts of food I consumed... but it's all for research (of course...) and I am so inspired.  There are so many dishes that I want to try replicate at home, so watch this space! :)

And great thing is, you don't have to go to upscale fancy restaurants to enjoy the best food... In fact, on my last night, my best friend Daniel took me to this dim sum place at a back alley of some street and it was cheap and cheerful and delicious.  Though sadly, we ordered way too much food for the two of us and couldn't finish them all... but that's also probably because the dim sum feast was our second dinner of the evening.

During my trip (in between meals) I went to a book shop and straight to the cookery section (what else...)... and as I was wandering around I saw the book I've been hunting for weeks! Not Quite Nigella by Lorraine Elliott, the woman behind THE Not Quite Nigella blog. I was told that the book is only available in Australia at the moment, so I was just so excited to have found it in Singapore.

I have been a fan (read: stalker) of Not Quite Nigella for sometime now.  Her daily food and travel posts are witty, insightful and mouth-watering. The Not Quite Nigella book, subtitled 'my path to happiness through baking & blogging', tells her journey from ditching her day job as a highly paid media strategist to following her passion for French pastries and becoming a full-time food blogger.  It's written with her brilliant sense of humour and she shares some of her favourite recipes too...

And one of them is Lorraine's mother's Singapore chilli prawns.  When I saw this recipe, I thought it's just the perfect homage to my recent trip.  I cooked this for Sunday lunch earlier and it's utterly, utterly delicious. It takes no time to cook, so you wanna make sure you prepare all the ingredients before you start cooking because as I said it cooks so quickly.  

Serve this with plenty of rice to mop all the gorgeous spicy, gingery, garlicky sauce. Yum.

Well, enjoy the rest of your Sunday everyone! *back to reading now...


Singapore Chilli Prawns
Find the list of ingredients and instructions, here.

Friday, 23 August 2013

Rice with Chinese Five Spice Pork Belly - Video

Update: Thank you everyone who watched, liked and shared the video.  I truly appreciate it.  But unfortunately the video did not make it to the next stage :(  Not to worry though, I'm sure there will be other opportunity.  I also have a new video which will be uploaded very soon, so be sure to check it out.  Again, thank you and have a delicious day! x

Rice is a staple ingredient in my family... We eat it almost everyday and we buy it by the sackful... It makes sense because rice is indeed a great neutral carbohydrate to which you can cook and eat with many dishes... both savoury and sweet... Vanilla rice pudding with cinnamon-y stewed apples, anyone? :)

This time I want to share with you a lovely one pot (or wok, in my case) meal, that is, rice with Chinese five spice pork belly.  It's super quick to make, affordable and utterly delicious...


I adore Chinese five spice... It's a wonderful blend of spices including fennel seeds, star anise, cinnamon, cloves and nutmeg.  And it is brilliant with pork belly.  Try rubbing the five spice on the pork belly rind with some salt and oil for your next Sunday roast... and you'll have amazing crackling, I promise.  My mouth waters just thinking about it...

Moving on... I cook the rice with homemade pork stock... and please do not panic!  It takes hardly any work to make...  If you get your pork belly from the butcher, do ask for some of the pig bones.  They are fantastic and they give wonderful sweetness to the stock.  Simply cover the bones with water in a pot and cook with a few couple of cloves of garlic, salt and black peppercorns (by all means add some carrots, onions, bay leaves and thyme if you want to go the whole shebang)... Let it comes to a boil and then simmer... carefully skim off any foam that comes to the top and voila... you have a pork stock.

Veg-wise I use pak choi, and you can use others... But I would suggest you use greens that can stand to the cooking and won't wilt to a mush... soft lettuces will not work here, but cabbage, kale or Swiss chard will be lovely.

This video is also my entry for Jamie Oliver's search for a food tube star competition.  I must say, filming a video for the internet is scary, and submitting it for a competition is just scary at a whole new level... but exciting at the same time :) I want to say a huge thank you to my friends Oflavia and Vincent for lending their cameras and talents... You guys are awesome.

I hope you will enjoy watching the video and I'd appreciate it if you can support me by hitting the 'thumbs-up' button on the channel.  Thank you so much in advance... Have a delicious day!

Rice with Chinese Five Spice Pork Belly
Recipe by Me

1 onion
4 red chillies
A small bunch of fresh coriander stalks
8 dried shiitake mushrooms, soaked in 100 ml of hot water
200 grams pork belly, diced
2 tablespoons Chinese five spice powder
300 grams rice, rinse under cold running water until the water underneath runs clear
100 ml Shaoxing rice wine
700 ml pork stock or chicken stock
Baby pak choi
Fresh coriander leaves
Olive oil
Salt and freshly ground black pepper

Monday, 12 August 2013

Lime and Rosewater Drizzle Cake

One of the things I miss most about England and working in an office is that ritual in the afternoon, around 3 o'clock, when my colleagues and I make ourselves a cup of tea or coffee.  And with our hot drinks we usually have something sweet, be it scones, rocky road, biscuits and on Fridays, we often have a slice of cake or two.

This past week, I really fancy a cake to go with my afternoon tea.  In this currently very hot weather, chocolate cake I think would just be too rich (you read that right and obviously I didn't mean it).  I wanted something fresh, so I decided to bake a lemon and rosewater drizzle cake.

I went to the market and I was shocked that I couldn't find any lemons... not a single one.  I went to another market and same thing happened.  I was disgusted (totally a first world problem).  But this didn't stop me from baking... I just have to improvise and use the next closest citrus... lime.

And it worked brilliantly! The cake is just what I wanted... light and fresh.  And the sharpness from the lime syrup with the perfume-y rosewater is beautiful.  I happen to absolutely love rosewater... The recipe below states two teaspoons of rosewater and I may have actually used a bit more, but start with one teaspoon because rosewater is a strong ingredient.  A little bit goes a long way.  A touch in the background is nice, but too much feels like eating a bowl of potpourri.  Anyone else a fan of rosewater?


In case if you're wondering, I did not take any of these pictures.  My friend Vincent who has been helping me with the video blog, is a keen photographer and asked if he could take some photos for the blog... an offer obviously I simply can not refuse.  But please don't get too used to this fancy treatments.... very soon, sometime this week in fact, Vincent is leaving for university :( So, I want to wish him the best of luck and thanking him for all the help these past weeks.

Lime and Rosewater Drizzle Cake
Recipe by Me

200 gr soft, unsalted butter
200 gr caster sugar
zest of 3 limes (save the juice for the syrup)
3 large eggs
125 gr plain flour
25 gr corn flour
1 tsp baking powder
a pinch of salt
1 tsp vanilla paste, or the seeds from 1 vanilla pod

For the lime and rosewater syrup
Juice of 3 limes
100 grams icing sugar
2 teaspoons rosewater

Preheat your oven to 180 C and line the base of your 20 cm cake tin with greaseproof paper and grease its sides lightly with butter.  In a bowl, add the butter, sugar and the lime zest. 


Cream the butter, sugar and zest.  But don't just mix it; really whip it until the butter is pale and fluffy.  This will result in a really soft and light crumbs.


I use a free standing mixer which makes it so effortless.  But a hand mixer or even by hand with a wooden spoon is possible.  You just need a little (a lot of) elbow grease. 


In a bowl measure out the flours, baking powder and a pinch of salt.  Then what I like to do is to add in the egg one at a time to the butter mixture, alternating with the dry ingredients.


Though in this occasion I accidentally cracked two eggs, followed by two thirds of the dry ingredients... mixing well... and then the last egg and the rest of the dry ingredients.  Then mix in the vanilla paste.


Pour the batter into your prepared tin and bake for about 35 minutes.


In the meantime, in a saucepan, make the syrup by boiling the lime juice and icing sugar.  When the icing sugar is dissolved, take the syrup off the heat and let it cool a little bit.  Then add the rosewater and give it a stir. 

You'll notice the cake is done when the edges of the cake have begun to shrink away from the sides of the tin.  Remove it from the oven to a cooling rack, but keep it in its tin.  Prick the top of the cake with cake tester or I actually used a thin spaghetti for minimal damage.... using a regular wooden skewer will cause too big holes.  Remove the cake from the tin and pour the warm lime and rosewater syrup all over the cake. 


Make yourself a cup of tea and you know what to do...

Sunday, 28 July 2013

White Chocolate and Coconut Brownies - Video

Don't worry, you have arrived at the right blog!  So, how are you liking the new layout?  I've been using the same template since I started this blog and I think it's time to give the blog an update.  I am still playing around with the design, so please bear with me...

I want to thank you to my talented friend Oflavia who created the blog header.  And a big thank you to everyone for your support on my previous video, Indonesian beef rendang.  It really gives us the encouragements and confidence to create more videos in the future.  And guess what, here's another one!

I was looking through my recipe journal and I came across this white chocolate and coconut brownie recipe which I have not made in years.  The last time I baked this I believe was second year at uni, so it's definitely going back a few years.  I had some friends over for a fajita dinner, and I served these brownies at the end of our meal.   They're so delicious, one of the guests gave me a kiss (oh you know who you are).


Whether if you're aiming for a kiss or not, you should give this a go.  They're not too sweet which I love, but that's a personal preference.  You can add the sugar quantity if you want to...  I love with every bite you get little nuggets of white chocolate and the combination with the coconut is gorgeous.


Before you watch the video, I want to talk you through some of the behind the scenes photos... and all the fun we had in the process.  Starting with the opening sequence as pictured below.  This two second clip was the longest to shoot.  We cut out a paper, and use this as a trace for the flour to create all the letters.  The using a small pastry brush we sharpen the edges, tidy them up and make it all... pretty.   I'm not very crafty and this was a true test of my patience... because not only we had to make this once, but twice... because the first shoot did not work (you'll see later in the video outtakes).


Here's the team hard at work :)


Next was the ingredients list photo shoot which involved me laying on the kitchen floor, under a chair.... We've all been there right?  Well, you've got to do what you've got to do.


Am I starting a new trend here? baking on the floor? No?


And here's the finished picture.  Please ignore my ridiculously veiny hand....


Without further a due, here's the new video!  I hope you enjoy watching it as much as we enjoy creating it for you.  Please give it a thumbs up if you have YouTube account or subscribe for more videos in the future.  Thank you and enjoy the rest of your Sunday... x